Monday 20 July 2015

How to: Smokey Eye Tutorial

Hi everyone!
Hope you're all well :)

Excuse this if it's bad, all photos were taken on my iPhone so it may not be great.

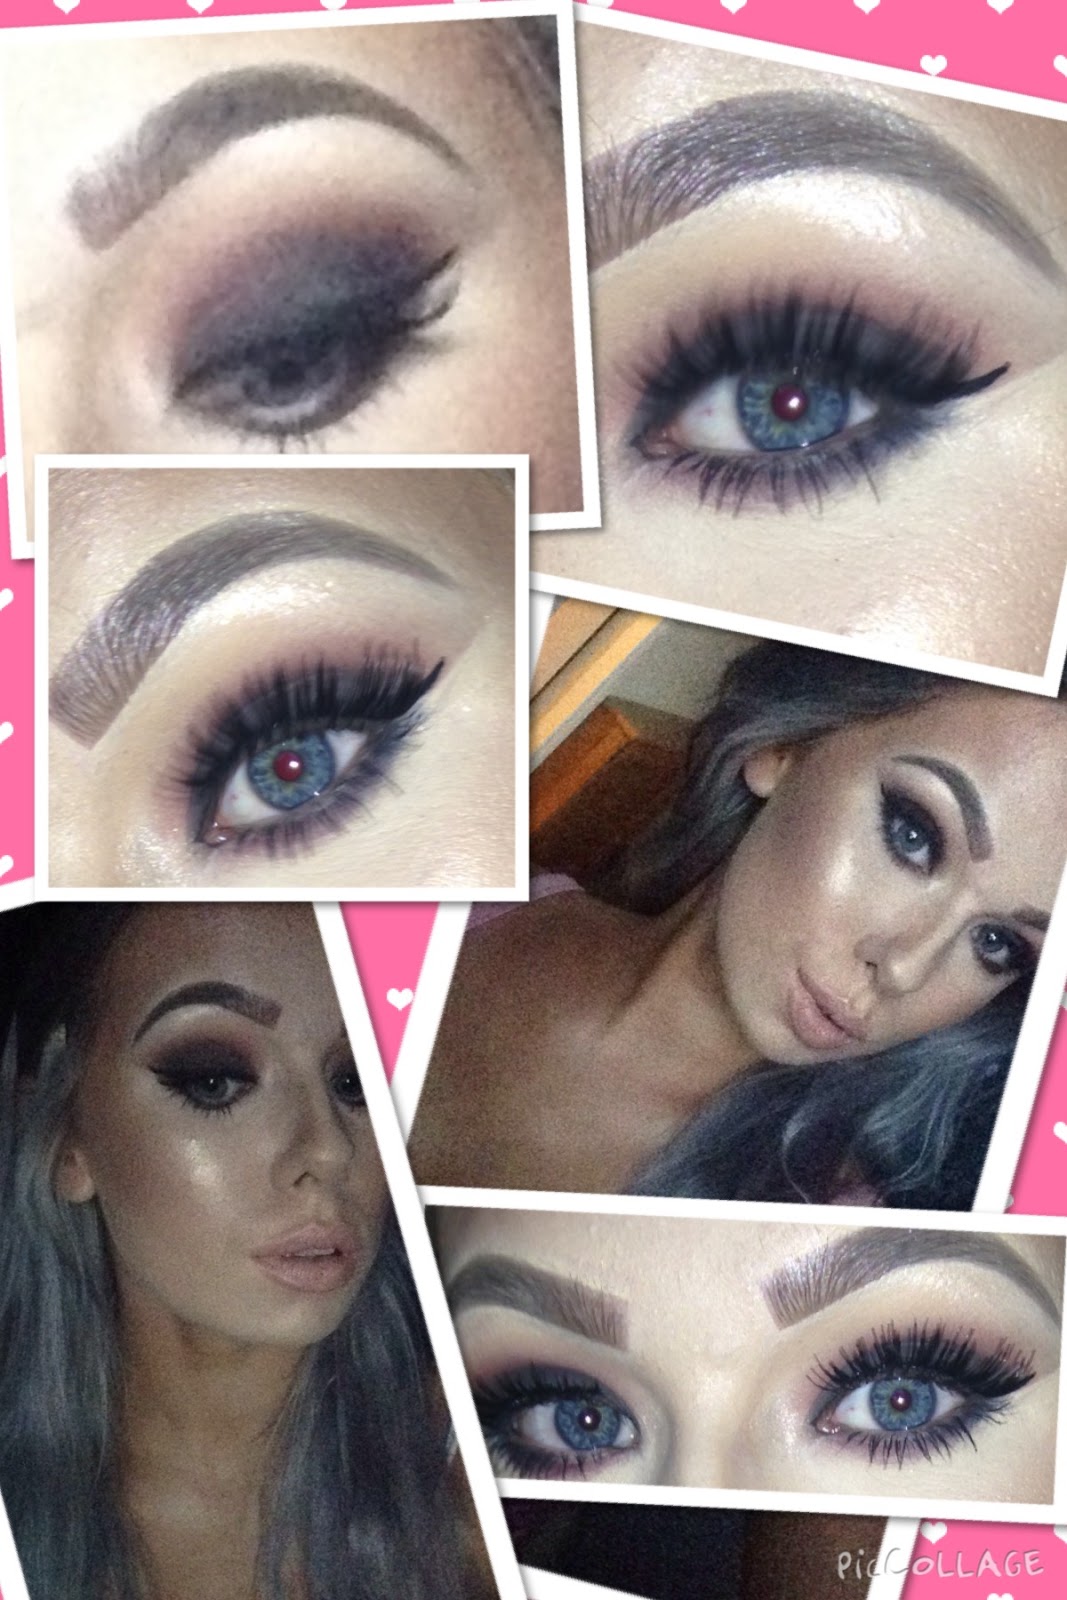
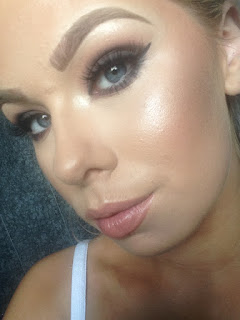
Today I wanted to share how I do a smokey eye.
It takes about 12 steps but it's really easy. All about layering and blending really! You don't need much just mainly a really pigmented black shadow. I didn't use anything under the shadow but if you want a really intense black just put down some black gel liner or even pencil to keep the darkness.

I am no expert and this by no means perfect but I did this look Saturday night and people seemed to enjoy the look so I said I would do this tutorial.

Okay, so firstly I always prep my skin, then do my brows and then do my eyes. I'd recommend doing eye makeup before foundation because dark shadows can be hard to work with and fall out is just a nightmare.

*DISCLAIMER* - this eye was created using all matte shadows.

Step 1: Start off with a blank canvas. I just prepped my eyes with Essence eye-shadow primer and set that with baby powder.


Step 2: Apply really light orangey toned shadows with a big fluffy brush. I'm using my Blank Canvas 28 neutral eye-shadow palette and I'm mixing three colours together to just create a small bit of depth to the eye.


Step 3: Intensify that depth even more by taken a stronger orange colour shadow. I'm taking this orange shadoe from my Smashbox Blue Eyes palette with the same fluffy brush.


Step 4: Now it's time to begin the darkness. My version of a smokey eye has orange and red tones going through it. I just think that looks nice but you use whatever colours you like/have. I'm taking the red shade and dark brown shade from my Sleek Ultra Mattes V2 palette. I'm using a smaller fluffy brush, you want to keep this in the crease and just a small bit above it. Don't bring this us too high. Mixing the two colours together is just swipe them across the crease. Don't worry if the line is harsh or messy. We'll blend it out later.


Step 5: To blend out the edge of that reddy brown shadow, I'm taking the two yellow toned shadows from the Ultra Mattes V2 palette and blending out the line. These colours are about the same shade as my base so it's okay to bring this up higher. I am also taking a clean brush now but it's about the same size as the last brush just cleaner.


Step 6: Not everyone has this palette but if you have a very dark brown, purple and black, you should be able to still create this look. You could even use the Sleek Ultra Mattes V2 palette. I have very small eye lids and I don't want to make my eyes any darker above my crease. So I'm focusing all the darkness just on the lid. I'm using a tiny flat brush that fit perfectly to my lid and also packs on colour. First, I'm taking my dark brown shadow and applying that to the inner corner of my eye and a bit to the centre of the lid, as you can see here.


Step 7: Next I'm applying the dark purple (2) to the center of my lid and blending in with the brown. Still using the same brush.


Step 8: And now I'm applying the black to the outer corner of my eye. Don't worry about fall out or it being messy, It will all be fixed and cleaned up. Blend the black into the purple.


Step 9: Time to blend. Taking a small amount of black on a small duo fibre brush from Real Techniques, I'm going to blend out all the lines and the crease colour. This is all about blending. Don't worry if some of the colours fade, you can go back in and pack those colours right back on. Just make sure you blend it all.


Step 9: Clean up time. Use baby wipes or makeup remove on a tissues and wipe away all that fall out/mess. Also create a straight edge on the outer corner by just wiping straight across.


Step 10: Take a cream concealer, mine is from Catrice for about €3.50. And a flat brush and clean up even more.


Step 11: Optional but add liner if you want. I love this liner from NYC, it's about €3 and honestly the best liner ever. I was crap at liner before I got this. It seems to do the work for you. Try to use the 'cleanup' line as a guide for your flick.


Step 12: Add lashes ( if you want ) and mascara and you're done!


And that is how I do my smokey eye! Hope you enjoyed it :) It's all about practice and blending. Please give it a go, I think a smokey eye suits all types and colours of eyes! I strobbed again today so if you want to learn about that it's just the post before this.

Overall look:


Thank you all so much for reading! Xx


Sunday 19 July 2015

Strobing! The New Contouring?

Hi everyone!
Hope you are all well :)
Today I wanted to talk about strobing, which in basic terms, is highlighting. However strobing is an extreme form of highlighting the face. Highlight is the opposite to contour. Contour creates shadows and makes things look slimmer, Highlighting is going to extenuate the facial feature you want to bring out the most.


 The white bits here on the face is where we would highlight normally. Highlight can be done with cream and powder products. Today I would just like to focus less on the cream products and more on the powder side of things. If you want to do cream highlight then just take a concealer or foundation or makeup stick about 2/3 shades lighter than your own shade and place under the eyes, down the nose, in the middle of the forehead and chin ( if you have a larger chin, highlight will make it stand out even more so try to avoid this area if you want ). Another option is to highlight under your contour too which I do most of the time to clean up the edges. Personally I love a really strong contour but if you don't you can skip this step also. Blend everything together and you'll have a beautiful looking cream contour and highlight.

Now lets take a step back further, before we even apply makeup. Prep the skin. I myself have very oily skin so after I have washed my face with a face wash, I cleanse my face to remove even more oil. At the moment I am using Garnier Micellar Water which can be bought in Penneys for €4.50 or any other chemists. The bottle is huge and will last you forever. After cleansing I moisturize my face, just use your normal everyday one. It is so so important to do this even if you have oily skin.

Next is the actual strobing prep! I use 3 products on the skin. First I take my MAC strobe cream which can be got in MAC or Brow Thomas, I have the mini travel version and it costs €10! I'd recommend this to anyone, even with oily skin and it's not too expensive to have a little bottle of it to yourself, a little goes a long way. Then I take my Rimmel London face primer. This smooths out my skin, over blemishes and fills in my pores while also adding a nice glow to the face. Finally, I use High Beam by Benefit, this is just the cherry on top. I only apply this on the cheeks,nose,lip and above the arch of my brow. By now you're looking some what like a disco ball but that's okay, that's what we are going for!


You should be looking something like this!


Next I just do my usual makeup routine, brows, eyes, foundation and then i get into the highlight and contour. I highlight a little bit by using a concealer under the eyes, down the nose, on the chin and forehead. I use MAC Pro longwear concealer in NC20 to do this. Then I cream contour, which I have a blog post on. Then I set my face with a powder from my Blank Canvas contour kit and now onto the strobing.

I used about 3 different highlighers to get this look so bare with me haha! 
  • Products used:
  1. MaryLou by theBalm €20.50
  2. Melon pigment by MAC €24.50
  3. Soap&Glory shimmer brick €15
  • Brushes used:
  1. Real Techniques duo fibre brush €30 in a set of 3
  2. Fan brush from eBay €14 in a set of 32


So I applied these highlighters very generously and heavily to the face. I may have even done two layers of each! I applied them on the cheekbones, down the nose, on the very tip of my nose, as a brow bone highlight, the inner corner of my eyes, above the arch of my brow and I think that is all haha! I dusted a small bit under my contour but it's not something that must be done, I didn't find much difference in it to be honest. You can also apply this to your cupids bow (top lip) to make you look like you have pouty lips! I think I did highlight my lips, i basically highlighted my entire face! It was very wet looking in the end, Such an intense look.


I am now a huge fan of strobing but I still love me some cheek bones! I don't think contouring will go away just yet. I think it may become less harsh as the highlight begins to take over but I don't see why we can't have the best of both worlds! Intense contour and highlight? I say yay.

I hope you enjoyed reading this and maybe learned something from it :) I think strobing is great for the summer time when you have a tan ( natural or out of a bottle ). Give it a go ladies and I would love to hear your thoughts and see photos!

I shall leave you with some more selfies so you can see for yourself and also my next posts will be my contouring kits and maybe a smokey eye tutorial? We shall see :)


Smokey eye tutorial perhaps?
Thank you for reading! Xx


Sunday 12 July 2015

My Makeup Collection: Eye-shadow palettes

Hi everyone!

I recently posted on my Facebook page ( https://www.facebook.com/JodiRocheMakeup ) if you would like to see what I have in my collection. The response was great so I thought I would begin sharing.

I have broken my collection up into sections as I have a lot of makeup so today I'll begin with eye-shadow palettes because that's probably going to be the easiest. I am dreading the lipsticks haha!

So without further a do here are the palettes I own, I'll give a brief opinion on each and if I would recommend them!

Okay so I think almost everyone and their mother has this palette! It's the Urban Decay Naked #1
I got this palette years ago, I think it was my first proper branded palette like not from a pound shop. It's still going strong today, I got mine in Debenhams and I believe it was in the 30's back then which is odd as it retails for €46 today but I could have had a voucher or discount, I can't remember!  I like this palette but I'm a sucker for matte colours so as you can see that is all I have really used. It's a nice palette and I suppose I am happy to have it in my collection but I find myself using it less and less as the years go on. I may re-discover my love for it sometime soon but I don't know really! If you're into nice, warm , shimmery colours then I would recommend this but most people love the good old matte, warm shadows so I don't know it's really up to yourself. Not much of a recommendation but I think people either love or hate these palettes and I did love mine but now I have so many it's become lost in my collection. I also love, love, love the packaging! My favorite packaging on any palette I own, I wish they could all be this way!


Next up I have the Urban Decay Naked #2 again I got this when it came out, years ago. Got mine in Debenhams and I think it was €40 but now it's €46. I honestly only got this because I have Naked #1. I really don't use this as much as I should. I do think both #1 and #2 are beautiful palettes like don't get me wrong they are gorgeous I just find myself using them less and less as I buy more and more. I'm not a huge fan of shimmer so I think that's why. Again I would recommend if you are a person who likes shimmer and some more cool toned shadows, it's not an essential in a makeup collection but I suppose if I'm stuck for an eye look to create, I know I can create something pretty from both of these palettes. Side note, I hate the packaging, the huge, chunky tin just does not appeal to me at all and I've gotten my finger or skin stuck in it once or twice so packaging is a no from me but it's more sturdy for travel.


So I have a tone of Sleek Makeup eye-shadow palettes. I have 8 to be exact which is more than enough for any one person to own. I absolutely love these palettes. Everything about them is just perfect, I use these palettes on myself and clients and I always get a beautiful look from them. They cost €10 and 12 shadows are in each palette so it's amazing value for money. I couldn't recommend these enough. There is a palette for everyone! Each palette has a mixture of mattes and shimmer apart from the Ultra Mattes palettes and all shimmer palettes, which I have none of so I don't know the names but yeah! I buy mine from my local Sam McCauley's or else Boots, Boots usually have offers such as buy one get one half price so two palettes for €15 is amazing. I also buy from cloud10beauty too which usually have sales on. I'd give 10/10 for these palettes.


Ultra Mattes V2

Oh So Special

Storm

Original

Bad Girl

Sunset

Au Naturel

Vintage Romance


Now I have my Tarte Tartlette palette which is an all matte palette. Amazonian clay matte palette. This was brought home to me from the States, shout out to my amazing family, Anitra & Co! This is probably my favorite palette because it's all matte and just amazing quality. Unfortunately we can't get Tart in Ireland as it's sold in Sephora and just in the States but if you know anyone in America or going, I would highly suggest getting this. The amount of matte looks you can create is endless and the colours will suit anyone and everyone. I use this regularly on myself and clients. The shadows blend out so beautifully. I can't praise this palette enough. I believe it's about $40 so roughly €35. Cheaper than the Urban Decay palettes. I use this more than any other palette I have ever owned. It's literally my baby. 10/10.


Now I have my Smashbox Blue Eyes palette. A gift from Kenny and Joanne! Everyone just knows to get me makeup as a gift at this stage haha! Anyway I love this palette and it does what it says on the tin, it really does make blue eyes pop. The colours inside are tailored for blue eyes to make them stand out and this palette does it. As you can see this is a well loved palette, the orangey shade is an amazing transition colour. This palette can be bought in Boots or Mulligans Pharmacy. Retails for €40 which I think is good, it's well worth the money. Again like my Tart palette the colours blend out so well. Another fav of mine, I use the orange shade every single time I wear eye shadow. 10/10.


Another Smashbox palette, the Smashbox Full Exposure. And another gift but from Jamesie this time! If you know me, you know I will take ages to use a new product. I am not one of those people that uses it right away. Like I just don't want to touch it because it's so perfect. It took me 2 months to use my Tarte palette so I think it's time I begin to use this one! Anyway I have no opinion as of yet but I know it's going to be beautifully amazing! I don't think you can buy this palette anymore, well I can't find it on Boots but you can buy a travel sized version :)


Blank Canvas is one of my fav brands. Anything they have, I want. I have their 28 Neutral eye-shadow palette which as the name suggests is 28 neutral eye shadow shades. There are about 4 shimmer colours in the palette but aren't even shimmery really. This palette is great for everyday use. Pigmentation is okay but build-able. It's honestly really light and natural, I remember I created a look one day using this palette alone and I still love this look to this day. The shadows blend out but sometimes almost to nothing if you blend a lot. This palette is like €10.95 and I bought mine from cloud10beauty. 5/10.


eBay is one of my fav places to get lashes from but that's another blog post. I have this palette from eBay and it was about €7 and I think 120 colours in it. Honestly, I don't ever use this palette except for when it's Halloween, Sounds silly but I think everyone should have one of these palettes, you never know when you may want a certain crazy colours but it is especially handy for Halloween time! The pay off of the shadows are grand too! I've had worse. For Halloween I'd give this an 8/10.


The Kardashians are my favorite family of all time, Say what you want about them but their cosmetics line is actually good! I got this palette as a gift from Aoife a while back and I'm still enjoying it to this day. I mainly use the top matte colours but that's just me and mattes haha! This palette is so little and so handy for travel. The products inside are amazing, you can create so many diffrent looks with just this one small palette. There is a slide underneath with a contour, blush and highlight shade but that's for another post. This palette I think is perfect for beginners or anyone who is into makeup not just makeup artists.The Kardashians makeup stand can be found in Mulligans Pharmacy. It's a great little palette. 8/10.


Last but not least is my Collection palette. I actually bought this for my debs last year! There was people going to MAC counters to get makeup done and heres me with my little Collection palette then haha! I wanted a nude eye and this is exactly what I needed. It's called The Nude Eye Palette. Collection can be found in Boots and I believe it was €5! Such a nice little palette, very soft and subtle but that's what I wanted. I haven't used this palette since but debs season is right around the corner and this just gives the perfect nude eye. This is also matte (shocker). For the debs 9/10.


Well girls and guys, that's all of my eye-shadow palettes! I hope you enjoyed reading this post and I will have one up next of my contour kits I think!

Thanks for reading! Xx